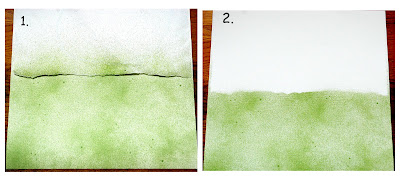
Picture 1: I always use white Bazzill for backgrounds. I took a normal writing-paper and I tore it horizontally, and then placed it over half of the white Bazzill. Then I used green Maya Mist and sprayed
the other half of the Bazzill.
Picture 2: When you remove the writing-paper you`ll get a nice natural look at the end
of the grass(green mist).
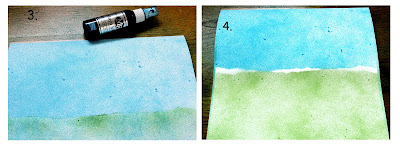
Picture 3: Then I place the same writing-paper(when it`s not wet anymore) over the green part, and spray with blue Maya Mist, to make the sky.
( I use Maya Mist when I want to cover most of the surface. When I only want splashes and smaller sprayed areas, I usually use Glimmer Mist(from Tattered Angels).
Picture 4: When you then remove the paper you will get an uneven stripe of white between the green grass and the blue sky.
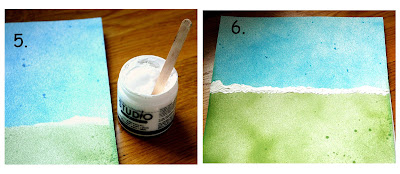
Picture 5: I then take white Gesso from Ranger, and “paint” in the uneven white line.
This will be mountains.
Picture 6: I paint a bit uneven and lumpy, to get a natural look. And now this has to dry for a while. (I can do some housework meanwhile )
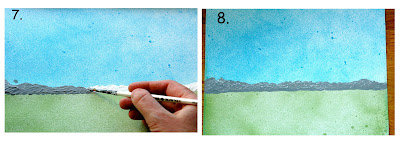
Picture 7: Then I take grey, acrylic paint, and paint over the Gesso.
Picture 8: As you can see at picture 7, I had an accident with the paint(to the left) ,
so I fix that by making an extra mountain there.
Time for drying again.
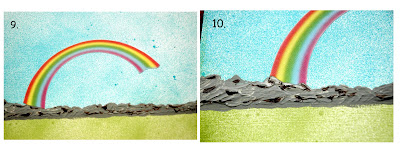
Picture 9: I now take brown acrylic paint and just make some small splats on the the grey mountains. While this is drying, I go back to my computer and the rainbow.
I decide to use canvas to print it on
(canvas with sticky background for printers), to make it more soft. Put the rainbow on my page.
Picture 10: I then paint a little over the end of the rainbow(the end that`s close to the mountains), to make it looks like the rainbow is behind of the mountains.
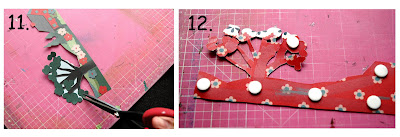
Picture 11: I now find my pattern papers. I have one from Jenni Bowlin with houses, trees and flowers on. I cut out this scene, and I don`t leave any sky left round the image.
Picture 12: I put some 3D gluedots on it, so it will stand out from the rest of the scene/page.
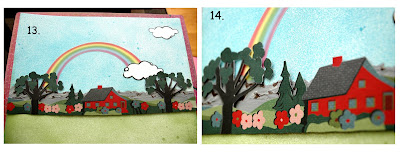
Picture 13: The cutout is placed on the page, together with a couple of clouds that I also cut out from a pattern paper. I place one of the clouds over the end of the rainbow.
Picture 14: Here you can see the 3D-effect. I think it make a nice look to use 3D-gluedots. You can also see how soft the rainbow looks, after using gaussian blur in Photoshop.
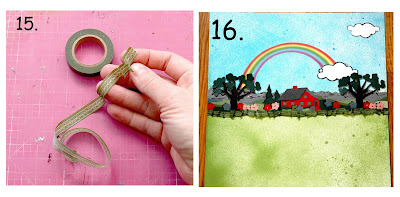
Picture 15: I just LOVE Washitape, and I use it on nearly all my layouts. This time I used this green Washitape to make some grass. I tear off a piece of the tape, and curl it a bit,
to make it look more like grass.
Picture 16: This is how it look like when I have placed the tape. Here I have used several small pieces of tape to make this long line of grass. It`s easier to curl it when the pieces aren`t too long.
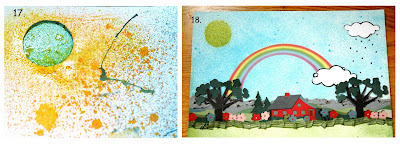
Picture 17: I need a sun on the page. So I cut a circle out of a piece of paper that I`m not gonna use anymore. And I use this as a mask; place the paper over the sky,
and spray yellow glimmermist in the round hole.
Picture 18: Here is what it looks like when you remove the paper again. And I have also drawn some raindrops under the cloud; you know, we need sun and rain to make a rainbow :)
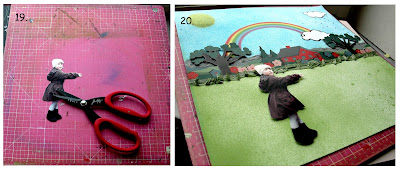
Picture 19: It`s now time for the photo. I use a picture of my daughter,Tuva, where she is pointing at something and wonder. I let there be no air left round my photos, but cut close to the subject.
Picture 20. I also use 3D gluedots on the picture.
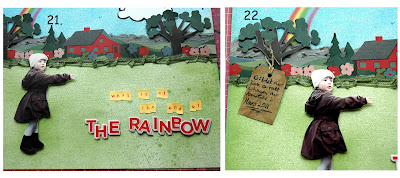
Picture 21: I need a title. And here I have written “What is at the end of the rainbow?”
I like using different letters for the title.
Picture 22: If you want to add some journaling, you can make small tags and just hang them round a tree or something. Sometimes I just write text in the mist-grass or sky, in a cloud or maybe write around the entire page.

Picture 23: And here is the result

7 comments:
Kjempefint!!!! Du e jo så goe :) KLEMZ
flott steg for steg forklaring og en nydelig LO :)
Så gøy å endelig få litt "innblikk" i hvordan du går frem med disse "eventyr-LOene" dine!!
Fantastisk flott LO! Og så kjekt å få følge hele prosessen.
Thanks again Brit for your class! You still a real inspiration for me!
Brit, how lovely!!!
Thanks for sharing, I will surely give it a try!
xox Julia Sáddi - Brazil
Jag ÄLSKAR att läsa och följa hur du bygger upp dina sagoboks-sidor!! Verkligen jättekul! och så kan jag se på din superfina layout med andra, helt nya ögon!! Vill ha mera!! xoxoxo
Post a Comment