Wednesday, 29 June 2011

TCR #64

I går var jeg på en koselig scrappekveld hos Linda Øvestad Olsen.
Hun hadde fått seg et sånt fantastisk morsomt kamera:
Fujifilm instax mini 7!
Og jeg var absolutt med på et prøvebilde :)
Linda halvveis utfordret meg til å scrappe bildet.
Jeg pleier jo å klippe rundt alle motivene mine, men det kunne jeg jo ikke
gjøre med dette bildet. Så det ble en liten utfordring :)
Men veldig gøy!
Fant ut at jeg skulle scrappe til TCR`s palett.
Så her er mitt bidrag til TCR #64:

Yesterday I was at Linda Øvestad Olsen to scrap with friends.
She had got this super camera:
Fujifilm instax mini 7!
And I was definitely in to try it out :)
Linda sort of challenged me to scrap the photo.
Normally I always cut out my motives, but of course I couldn`t
do that with this picture. So it was quite a challenge :)
But really fun!
I decided to make a layout for TCR`s pallette.
So here is my contribution on TCR #64:


Sunday, 26 June 2011

Skissedilla # 118

Skissedillas skisse #118 er nå klar :) Det er Lene/nabon som har laget den, og den er kjempetøff.
Så stikk innom Skissedilla, og bli med og lek med oss :)
Her er ukens LO fra meg :)
I ABC-en har jeg skrevet ting som jeg forbinder med ungene.

Skissedilla`s sketch #118 is ready now :)
It`s Lene/nabon that made this one, and it`s really cool.
So come visit us at Skissedilla, and play along :)
Here is my layout for the week :)
The ABCs are about things that have to do with the children.

Saturday, 25 June 2011

Enda en "she art" :)

Nå har jeg fått laget meg enda en "she art" etter online kurset av Christy :)
Selve jenta er nok litt mer inspirert av Sandra
(som selv var inspirert av Julie Nutting :) ).
Det er veldig kjekt dette her, så må nok prøve å lage noen innimellom scrappingen ;)

I have made another "she art" after the online class from Christy :)
The girl is more inspired by Sandra (that was inspired by Julie Nutting :) ).
This is so much fun, so I have to try and make some in between my scrapping ;)

Monday, 20 June 2011

Websters Pages Celebrates

Mye kjekt inne hos Websters Pages nå ;)


Sunday, 19 June 2011

Skissedilla #117

Det er tid for skisse #117 hos Skissedilla,
og vi har med oss Tara Anderson fra Island som gjestedesigner denne uken.
En superflink dame! Så ta en kikk i bloggen hennes for masse inspirasjon :)
Jeg har brukt et bilde som vi tok på ferien vår i Tyrkia på denne LOen.
Synes både far og datter var riktig så søte her :)))

It`s time for sketch #117 at Skissedilla,
and we are so lucky to have Tara Anderson from Iceland
as our guestdesigner this week.
A really creative woman! so take a look at her blog for lots of inspiration :)
I`ve used a photo taken on our trip to Turkey at this layout.
I think both father and daughter are so cute here :)))

Monday, 13 June 2011

Banner-layout hos Websters Pages

I går kveld fikk jeg en veldig koselig mail :) Det var fra Websters Pages Inspire Me.
Jeg hadde blitt utvalgt til denne ukens Banner-layout :)
Utrolig gøy! :)

Yesterday I got a great email from Websters Pages Inspire Me.
My layout was chosen to this weeks Banner-layout :)
I am so happy! :)

Her er hva de skrev om LOen min:
This is what they wrote about my layout:
"Stylishly simple is how I describe this week's banner layout from inspireME member Brit Sviggum!

Brit shows us that LESS truly is MORE in her layout. With the neutral kraft colored background and a smear of paint, Brit added the beautiful chair design from our Ladies&Gents line and a cut out of the cute car from our Trendsetterline that TOTALLY makes a statement.

It's bright, it's bold and Brit's layouts shows that you can create simple and

stunning graphic style layouts with Webster's Pages products!

Congratulations on being the featured project of the week! "

Steg for steg / Step by step
Tidligere ble jeg spurt om å holde en klasse på
et Canadisk hobbyforum, Lucky 7 Factory.
De ville at jeg skulle lage til en steg-for-steg forklaring på en LO.
Og i Mai ble det lagt ut. Her kan dere se hva jeg lagte :)
Teksten er på engelsk, men jeg håper det går greit.
Gidder rett og slett ikke å oversette :))))

I was asked from a Canadian hobbyforum(Lucky 7 Factory) to hold a class.
They wanted me to make a step-by-step explanation for a layout.
It was published in May. And here you can see what I made :)


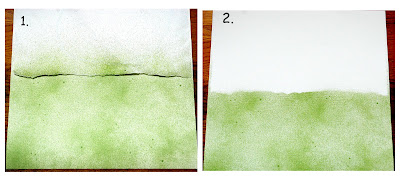
Picture 1: I always use white Bazzill for backgrounds. I took a normal writing-paper and I tore it horizontally, and then placed it over half of the white Bazzill. Then I used green Maya Mist and sprayed

the other half of the Bazzill.

Picture 2: When you remove the writing-paper you`ll get a nice natural look at the end

of the grass(green mist).
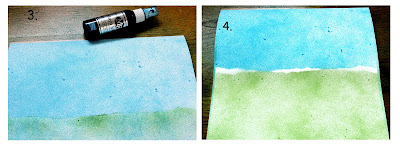

Picture 3: Then I place the same writing-paper(when it`s not wet anymore) over the green part, and spray with blue Maya Mist, to make the sky.

( I use Maya Mist when I want to cover most of the surface. When I only want splashes and smaller sprayed areas, I usually use Glimmer Mist(from Tattered Angels).

Picture 4: When you then remove the paper you will get an uneven stripe of white between the green grass and the blue sky.
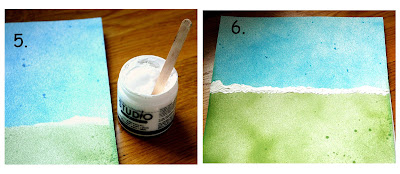
Picture 5: I then take white Gesso from Ranger, and “paint” in the uneven white line.

This will be mountains.

Picture 6: I paint a bit uneven and lumpy, to get a natural look. And now this has to dry for a while. (I can do some housework meanwhile )
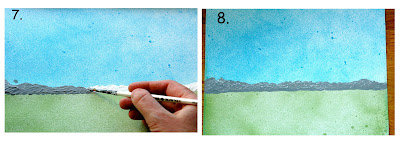

Picture 7: Then I take grey, acrylic paint, and paint over the Gesso.

Picture 8: As you can see at picture 7, I had an accident with the paint(to the left) ,

so I fix that by making an extra mountain there.

Time for drying again.
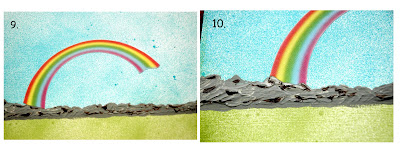

Picture 9: I now take brown acrylic paint and just make some small splats on the the grey mountains. While this is drying, I go back to my computer and the rainbow.

I decide to use canvas to print it on

(canvas with sticky background for printers), to make it more soft. Put the rainbow on my page.

Picture 10: I then paint a little over the end of the rainbow(the end that`s close to the mountains), to make it looks like the rainbow is behind of the mountains.
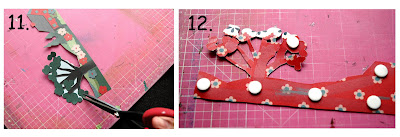

Picture 11: I now find my pattern papers. I have one from Jenni Bowlin with houses, trees and flowers on. I cut out this scene, and I don`t leave any sky left round the image.

Picture 12: I put some 3D gluedots on it, so it will stand out from the rest of the scene/page.
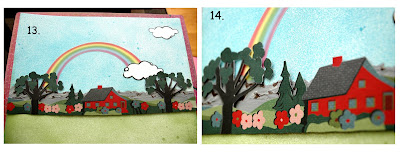

Picture 13: The cutout is placed on the page, together with a couple of clouds that I also cut out from a pattern paper. I place one of the clouds over the end of the rainbow.

Picture 14: Here you can see the 3D-effect. I think it make a nice look to use 3D-gluedots. You can also see how soft the rainbow looks, after using gaussian blur in Photoshop.
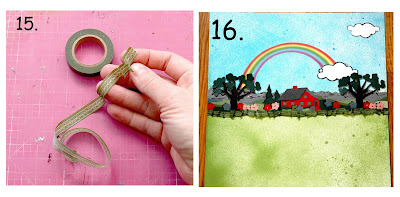

Picture 15: I just LOVE Washitape, and I use it on nearly all my layouts. This time I used this green Washitape to make some grass. I tear off a piece of the tape, and curl it a bit,

to make it look more like grass.

Picture 16: This is how it look like when I have placed the tape. Here I have used several small pieces of tape to make this long line of grass. It`s easier to curl it when the pieces aren`t too long.
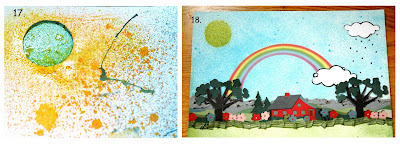

Picture 17: I need a sun on the page. So I cut a circle out of a piece of paper that I`m not gonna use anymore. And I use this as a mask; place the paper over the sky,

and spray yellow glimmermist in the round hole.

Picture 18: Here is what it looks like when you remove the paper again. And I have also drawn some raindrops under the cloud; you know, we need sun and rain to make a rainbow :)
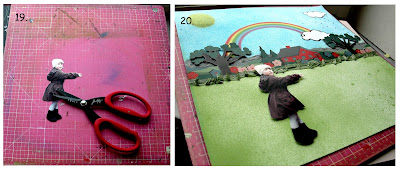
Picture 19: It`s now time for the photo. I use a picture of my daughter,Tuva, where she is pointing at something and wonder. I let there be no air left round my photos, but cut close to the subject.

Picture 20. I also use 3D gluedots on the picture.
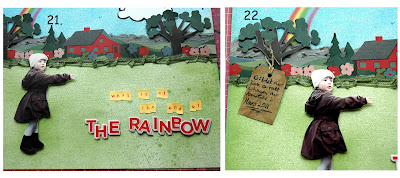

Picture 21: I need a title. And here I have written “What is at the end of the rainbow?”

I like using different letters for the title.

Picture 22: If you want to add some journaling, you can make small tags and just hang them round a tree or something. Sometimes I just write text in the mist-grass or sky, in a cloud or maybe write around the entire page.


Picture 23: And here is the result


Sunday, 12 June 2011

To Skissedilla-LOer

Nå er vi hjemme igjen etter to ukers ferie i Alanya/Tyrkia.
Her har vi kost oss i herlig varmt vær, badet, shoppet, SPIST og besøkt familie.
Min mann er fra Alanya, så det ble mye besøk hos familien :) Ungene har kost
seg med besteforeldre, onkler, tanter og søskenbarn :)
Det blir nok noen LOer fra meg med Tyrkia-bilder fremover ;)
Har ikke fått lagt ut Skissedillaskisse #115, så her kommer den :)
Og samtidig kan dere se min LO til denne ukas skisse.

We are now back from our two weeks holiday to Alanya/Turkey.
We had lovely,hot weather, have been swimming, shopping, EATING and visitting family.
My husband comes from Alanya, so we went to see all his family .
The kids were having fun with grandparents, uncles, aunts and cousins :)
I guess there will be some layouts with Turkey-photos from
me in the nearest future ;)
Here you can see my LO for Skissedillasketch #115,
and also the one for this week`s sketch.